Local issue fields
If you need a new issue parameter that isn't available among system fields in Yandex Tracker, you can add local fields to your queue. You can see the list of system global fields on the Yandex Tracker settings page.
A local field can only be used in the issues of the queue it's linked to. The advantage of local fields is that the queue owner can manage them without the risk of affecting the workflows in other queues. Users working in other queues will not see this field in their issues.
Creating a local field
By default, only the queue owner can configure a queue.
-
In the left-hand panel, click Queues and select a queue.
-
In the top right corner of the queue page, click Queue settings.
-
Go to the Local fields tab.
-
Click Create.
-
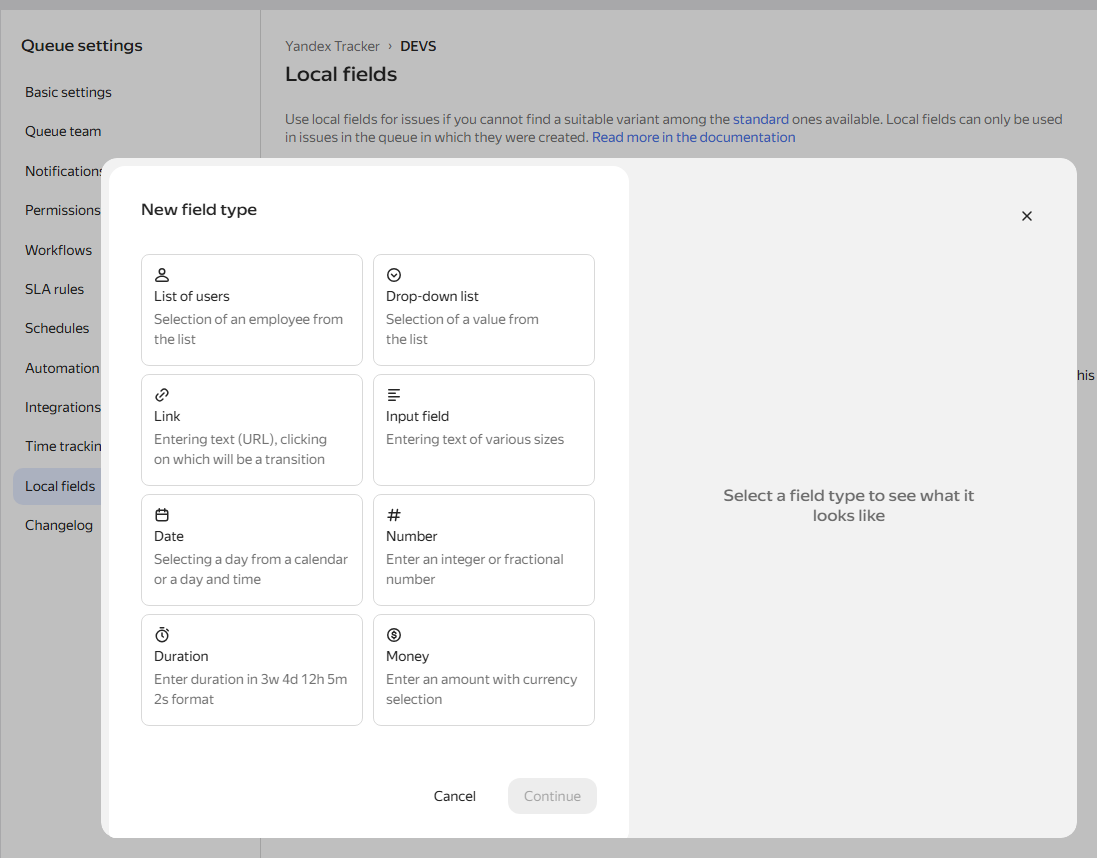
Select the field type and click Continue.
-
Set parameters for the new field.
Common parameters:
-
Name: Try to give short and concise names to your fields.
If necessary, add a field description. -
Name in English. This name is shown in the English interface of Yandex Tracker.
-
Category All Yandex Tracker fields are grouped into categories. Start typing the name of a relevant category. For example,
System,Time tracking,Agile,Email, orSLA.
For more information about the fields and categories, see Standard issue fields. -
A key is generated automatically according to its English name.
Special parameters:
-
Multiple choice. Enable this option so the user can enter multiple field values.
Only for "User list" and "Drop-down list" field types. -
Field type. Specify the field value format.
Only for "Number", "Date", and "Input field" field types. -
Values in a list. Enter the possible values and their order.
Only for the "Drop-down list" field type. You can add up to 3000 values to a "Drop-down list" field. Clicking the field displays up to 10 items at a time.
-
-
Click Create.
You can only add a limited number of fields. If you want to add more fields, contact technical support to increase the limit.
Local field types
You select the field type when creating the field. The type determines which values can be entered in an issue and which parameters are available in the settings.
|
Field type |
Allowed values |
Settings |
Usage example |
|
User list |
Selecting an employee from a list. |
The Multiple choice parameter lets you specify several users. |
A "Reviewer" or "Tester" field for assigning specific people to a role in an issue. |
|
Drop-down list |
Selecting a value from a predefined list. A list can contain up to 3000 values. Clicking the field displays up to 10 items at a time. |
The Values in a list parameter sets the values and their order. The Multiple choice parameter lets you select several values. |
A "Platform" field with the values "iOS", "Android", and "Web". |
|
Link |
Text (URL). Clicking the value opens the address. |
No type-specific settings. |
A "Mockup" field with a link to a design in Figma. |
|
Input field |
Text of various lengths. |
The Field type parameter sets the format: single-line or multi-line text. |
A single-line "Build version" field or a multi-line "Steps to reproduce" field. |
|
Date |
A day selected from a calendar, or a day and time. |
The Field type parameter sets the format: date or date and time. |
A "Release date" field or a "Testing start" field with an exact time. |
|
Number |
An integer or a decimal number. |
The Field type parameter sets the format: integer or decimal number. |
An integer "Number of affected customers" field or a decimal "Complexity factor" field. |
|
Duration |
A period of time in the format |
No type-specific settings. |
An "Approval time" or "Customer response time" field. |
|
Money |
An amount with a currency. The Money and rate subtype also lets you specify the employee's rate: |
Subtype selection: Money or Money and rate. |
A "Budget" or "Work cost" field. The Money and rate subtype suits a "Specialist cost" field. |
The parameters common to all field types — name, category, and key — are described in Creating a local field. To prevent editing a field value or to always display the field in an issue, change the readonly and visible parameters with a request to the Yandex Tracker API. API type names are listed in the request to create a local field. Value formats for API requests are described in the Local fields section.
Copying a local field
To create a copy of an existing local field:
-
In the left-hand panel, click Queues and select a queue.
-
In the top right corner of the queue page, click Queue settings.
-
Go to the Local fields tab.
-
Select a field and, on the right, click → Copy.
A window for creating a new field opens, with the original field parameters already filled in. You'll need to change some parameters to prevent duplicates. These parameters will be highlighted in red.
-
Tap Create.
Edit a local field
-
In the left-hand panel, click Queues and select a queue.
-
In the top right corner of the queue page, click Queue settings.
-
Go to the Local fields tab.
-
Select a field and, on the right, click → Edit.
A window with field parameters opens: change the value as needed and click Save.
-
To change the category of a local field, click → Change category.
Start typing the new category's name and select the option from the list.
You can also edit the field properties, category, or visibility by making a request to the Yandex Tracker API to edit a local field.
Delete a local field
You can't delete a local field, but you can hide it from the Yandex Tracker interface. You can't add a hidden field to an issue.
-
In the left-hand panel, click Queues and select a queue.
-
In the top right corner of the queue page, click Queue settings.
-
Go to the Local fields tab.
-
Select a field and, on the right, click → Delete.
You can also configure the global field visibility by making a request to the Yandex Tracker API to change a local field:
- To hide a field, set
truefor thehiddenparameter. - To restore a field, set
falsefor thehiddenparameter.
Using local fields
Local fields work the same way as global fields, but there are some nuances to consider:
-
When selecting an issue filtering parameter, you can only search for a local field in one queue. To do this, enter a queue key and a period before the field name (for example,
DEVS.Tester). This will help you avoid confusion if you use local fields with the same names in different queues. -
To search for issues by a local field using the query language, enter a queue key, period, and the field name in Russian or English. Then add a colon and the local field value. For example,
DEVS.Tester: "John Doe". If the field's name includes several words, enclose the name in double quotes. -
When you move or copy issues with local fields to a different queue, the local field values will be automatically deleted.
-
When working with macros, triggers, or auto actions, see how to use local fields in variables.